Nemesis is a bit of a cad in Resident Evil 3. The big lad thinks he’s the bee’s knees and spends a lot of his time running up to you and punching you really hard.
I’m here to tell you that he ain’t all that bad and if you’re struggling with this particular dentist’s delight, I’ve got some handy tips to get you through.
Please note: The handful of item locations mentioned in this guide are for Normal and Hardcore difficulties. The game is remixed on higher difficulties and the enemies a lot tougher.
Nemesis Downtown encounters tips & tricks
Dynamic Nemesis encounters only happen during the Downtown section of the game, and depending on what order you do things in, you can limit your exposure to Nemesis encounters. That said, it’s worth sending him packing a few times to help unlock some early upgrades.
Once you’ve passed the initial on-rails nemesis encounters, the next time you will see him is on the way back from restarting the power. Do this event too early and you’ll be stuck with Nemesis chasing you while you go round cleaning up, so your best option here is to first grab the lock pick from the corpse just outside the Subway Power Substation, grab the bolt cutters and do your backtracking clean up first. Once all your map is blue, only then head in to reset the power. This way, all you have to do is set the train course at the Subway Office and get back to Carlos and the gang.

If you decide to fight him – and you should definitely do this a few times for the upgrades he drops – there’s a few things to keep in mind:
- Running away is pointless – Nemesis can close ground to you quickly, either by doing a horrendously fast run or super leaping in front of you. Keeping a few feet back is the optimum distance to engage. Also, if you try and run away, sometimes he likes to use his tentacles to grab you and pull you back in. What a git.
- Get that dodge button ready – Nemesis likes to throw out haymakers like he’s Mike Tyson, and boy do they hurt. Getting the timing down for Jill’s perfect dodge move is essential here as it will snap you straight in for a headshot. Speaking of which…
- C-c-combo! – Sometimes Nemesis will swing three times in a row, meaning that even if you dodge the first strike, there’s a chance you’ll be caught by the second… and third. You’ll need to watch his animations closely and if you see him go for another swing immediately, get ready to dodge once more.
- Look out for his roar attack – This is a pain if you get caught as you will be momentarily stunned for enough time that he can swing in. Stay your distance or if you are lucky, dodge out the way – the timing is tricky, here.
- The environment can be your friend – Electricity boxes work a treat on Nemesis, much like they do on the Zombies, so make sure to use them. It’s also tempting to want to blow up the explosive barrels in the opening area, but one hit from them will instantly down Nemesis so can be well worth saving.
- Grenades are a one hit KO – Another one hit and down. Save your grenades for when you are in a bind.
- Always go for headshots – Every time you shoot, you want to maximise damage. Four or five shotgun blasts to the head is enough to down Nemesis. On your initial runs, you’ll want to conserve as much ammo as possible.
- He drops some cool upgrades early game – The G19, your base handgun, can get two upgrade drops from Nemesis. The Moderator, which tightens spread making critical shots easier, and the Extended Mag, which increases your clip to 33 rounds. It’s well worth fighting Nemesis to unlock these.
After returning to Carlos in the Subway
Once you team up with Carlos again, it won’t be long before Nemesis is back on your tail.
This part is pretty easy. Just keep running and make sure you dodge his initial swings. Then, when you pass the electricity box, turn around and shoot it. This gives you time to run to the back room and work on kicking in the grate that will take you to the next area. Only kick it once, mind as Nemesis will be on you again before you know it.
You’ll notice there’s a red barrel in the back room, which you should use to take him down when he approaches. When he goes down, he will drop another container with some shotgun rounds which you should grab before quickly making your escape to the Sewers.

Rooftop Demolition Site fight with a flamethrower
There’s not much you can do at the start of this encounter apart from run up to the roof. When you reach the top, you’ll have no choice but to fight him.
At the start of this battle, he won’t do much except for a slow walk while shooting streams of flames at you. These can be easily avoided at distance, but as he takes damage, Nemesis will start to walk faster and try to hit you with his flamethrower – don’t be fooled into thinking you’re safely out of reach, as flames also come out the end.
To defeat him you want to shoot the fuel tank on his back. Keep shooting it till it explodes and eventually he will get super mad while being on fire – not a good combo – and will charge at you. If he grabs you, it’s massive damage time, so avoid at all costs while unloading everything you have into him until he drops.
The rocket launcher chase through Downtown
This another on rails section where you can get by with watching his targeting laser and moving out the way after it turns red. Missiles should safely fly by. If somehow he manages to catch up, he will still try and hit you so watch out for that. Otherwise, just keep going until the cutscene plays out.

Bridge chase and Clock Tower battle
Much later in the game, Nemesis is starting to get much more feral, more dog-like in his form. When you see him, he’ll channel his inner pooch and chase you across a bridge, leading into another boss fight just below the clock tower. The best weapons for this fight are the shotgun and grenade launcher with mine rounds – acid and flame rounds are also pretty effective.
Keep your distance and watch out for his massive swings while piling bullets into his face. The shotgun works really well at medium distance and if you start to run out of ammo, keep an eye on the outskirts of the arena, as car doors will fly open revealing goodies for you to grab. Also, take advantage of the shrubbery in the middle of the arena. You can quite easily kite around it and avoid everything Nemesis throws at you.
After you’ve done enough damage, Nemesis will start running and mount the sides of the area, running in circles around you until he decides to stop and do a giant belly flop from hell at you. This is where you want the grenade launcher’s mine rounds. If you lay one in his path while he’s running, he’ll come flying off the side and expose his pink thing for you to shoot at. You can easily unload a full clip into it. After enough damage has been dealt, Nemesis will fall, before doing something truly disgusting.
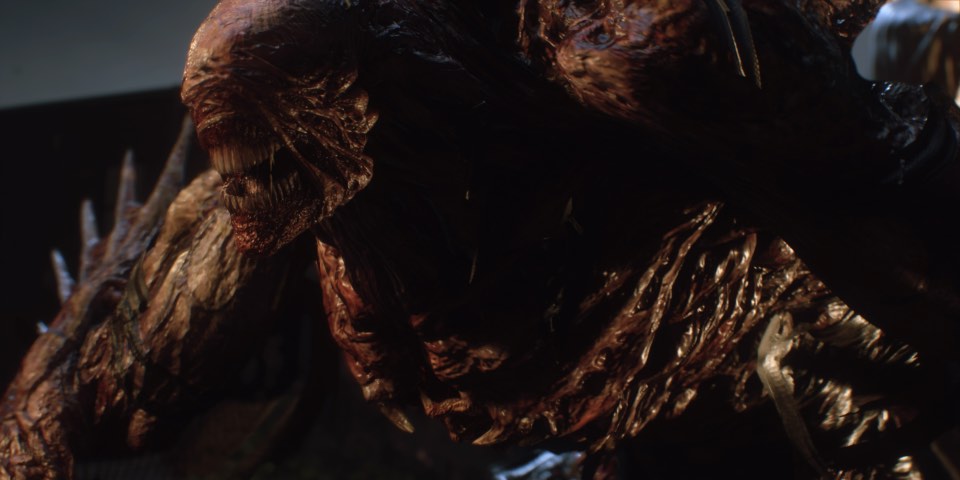
Mutated Nemesis in the NEST Labs Factory
In the final area of the game, you inevitably encounter Nemesis again, in the same bounding form as before. Thankfully, this fight is fairly similar to the last, just without the shrubbery in the middle to protect you, and with random zombies spawning in that can catch you unawares.
As before, unload bullets and dodge attacks until a cutscene plays with good boy Carlos. Then, Nemesis will do his signature roar which will spark the electric pylons on the outskirts of the arena. Remember that, because they come in handy for the next part of the fight.
Like the previous encounter, Nemesis will start to run and then mount the outskirts of the arena, stopping after a while to jump attack you. Sometimes, Nemesis will actually hold position on one of the pylons before leaping. This is your opportunity to shoot the red light next to him and douse him in acid. Otherwise, as before, lay a mine in his path to send him tumbling back down and expose his fleshy bit. Just shoot that a few times and he’s done.
The final fight
For those familiar with the original game, you’ll have fond memories of blowing final globby Nemesis away with a rail gun, and Capcom have outdone themselves for this remake.
First things first, turn around and activate the panel. It opens up and you receive a very anime looking railgun which you can fire at the mess of a monster that Nemesis now is, dealing big damage. The railgun will need to be recharged after each shot by pushing each of the three gigantic batteries back into their slots.
Don’t try and do this straight away, as it opens you up for attack. Instead, look at the glowing parts on Nemesis and shoot them to momentarily stun him, giving you time to start putting the batteries back in place. On Normal difficulty, you have time to push two batteries in before he gets back up, but on Hardcore or higher you’ll only have enough time to do one. Rinse and repeat the process of stunning him and then reloading the railgun one or two batteries at a time, making sure you keep out the way of his giant swings at you.
Once it’s reloaded, grab that railgun and enjoy putting this naughty boy down for good!