
One of the key tricks of the DualSense Edge controller is the ability to create custom controller profiles that can feature remapped button layouts, tweaked trigger and analogue stick deadzones, and most interestingly, modify the analogue stick sensitivity curve. There’s five sensitivity curves built into the PS5 custom profile tool, but how do they work and what do they do?
How do DualSense Edge sensitivity curves work?
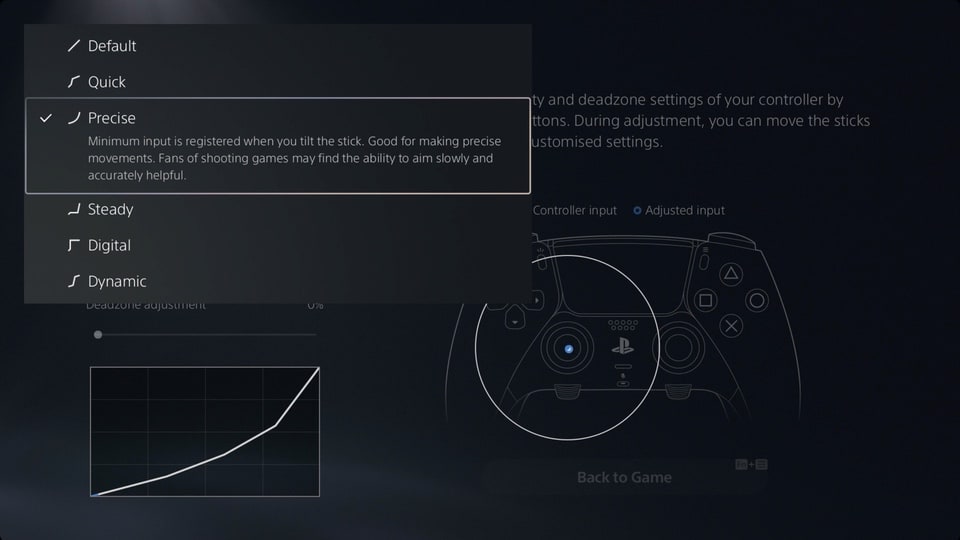
Within the Stick Sensitivity / Deadzone section, you’re able to pick a sensitivity curve, make a curve adjustment and a deadzone adjustment to your liking. The effect of this is depicted in a graph that, for the default curve show a linear stick sensitivity from the bottom left corner to the top right.
Picking a sensitivity curve takes that linear motion from 0-100% input, splits it into multiple sections, and will either reduce or increase how sensitive it is. A very basic example could have the first 50% input reduced by half – so moving it 30% would result in a 15% input to the game – and then the second half made more sensitive to reach 100%. In-game, this would mean that small stick movements would have even smaller in-game movements for more precision, while full stick movements would still have the full effect, as always.
Tweak acceleration and sensitivity curves on the Edge for specific games.
Beyond picking a sensitivity curve, you can then make a curve adjustment that makes the effect more or less severe. You can see this represented in the menus, but you can also test this quickly in game to see if your changes will work for you, and how it gels with the game’s interpretation of inputs. From this menu, press Function and Option together and you’ll return to the game to be able to play, with a second press of Function and Option returning you to this screen in the profile customisation.
What do the DualSense Edge sensitivity curves good for?
Sony outlines what each of the sensitivity curves is intended to do and gives quick genre examples. We’ve then added more specific examples.
Default
Standard PlayStation 5 sensitivity.
Quick
The amount of registered input accelerates as you tilt the stick. Good for making quick movements. Gain the upper hand by quickly aiming in fast-paced shooting games. eg. Call of Duty: Modern Warfare 2 using SMG, AR and Shotguns in close quarters combat.
Precise
Minimum input is registered when you tilt the stick. Good for making precise movements. Fans of shooting games may find the ability to aim slowly and accurately helpful. eg. using sniper rifles in Sniper Elite 5 or battle royale games like Apex Legends and Warzone 2.0.
Steady
Registered input is limited even if you tilt the stick far. Enables smooth and stable movement. Ideal for when you need to move smoothly in action games. eg. Horizon Forbidden West when targeting weakspot.
Digital
Tilting the stick even slightly will register nearly maximum input. Functions like the directional buttons on the controller. Get instant input reaction for your fighting and action games. eg. Street Fighter 6 or Tekken 8, letting you use the analogue stick instead of D-pad.
Dynamic
Registered input is limited when you tilt the stick slightly or far, but accelerated in the middle range. Enables versatile gameplay in shooting games, where you may need to aim carefully, but also turn quickly. eg. best for single custom profile use in games with mixed circumstances, especially Battle Royales and large scale FPS modes in Battlefield 2042.
If you want more of these direct examples, here’s eight games where we’ve selected some great DualSense Edge games with tweaks and changes to custom profiles to get the best out of the controller. And want to know evenmore of its tricks? Check out our DualSense Edge review here, and learn how to replace the analogue stick modules.